This is the multi-page printable view of this section. Click here to print.
Getting Started
- 1: First Steps
- 2: First App
- 3: How to Plan an App
- 4: How to Build an App
1 - First Steps
Get started in your FREE Personal Space
To get started building Apps with Logiak, simply
- Login to Logiak
- Create your FREE Personal Project Space
- Create your first Project in that Space
Your new Project..
Each new Project is created with an App.
- The App is initially named “project App”, where project is the name your gave to the Project
- The App is initialised with a Login Component
- The Login component has a randomly selected background image from Pexels curated list, for fun and possible inspiration.
- Everything can be changed!
Now follow the steps to build a functioning data managment App in three minutes !
2 - First App
Rapidly create a first data management App
Here we create a first App: a simple data management App.
This whole thing may take you 3 minutes or so, but we think that is not a very long time to create a fully-functional App :)
The first question is: what kind of data do we want to manage?
Suppose we want to manage Events and for us an Event has the following three bits of information:
- title (text)
- scheduled (a date)
- cancelled (true/false)
What we do in Logiak is define a Data Object.
Here is a video to show how to do this in your Project.
Notes
By default there was a UUID auto-filled field already added (as unique field )
In the next video, when you create an Events Listing you have to select a field of Event to show by default for each row
3 - How to Plan an App
You’ve created a Project Space and a Project within that Space. Now…
How would you plan an App?
Forget Logiak for the moment, consider the question: how would you plan out what you want from an App?
Events App
Let us suppose that your company manages Events of some kind and you want an App to help with this.
Suppose you want the user to login and then perhaps see all Events currently in the database. The user should also be able to register a new one and to select one from the list.
Planning an Events App
You might start to map out by sketching a flow chart.
Something like this perhaps:
  graph LR
        A[Logs in] --> B[Views List of events in the db]
        B --> C[Can add a new event]
        C --> B
        B --> D[Can select events from List]
The Flow Diagram in Logiak
Now let’s look at Logiak.
To build an App, you do the same kind of thing as we have done above to plan an App.
To build an App with Logiak, make a flow diagram out of Components linked together.
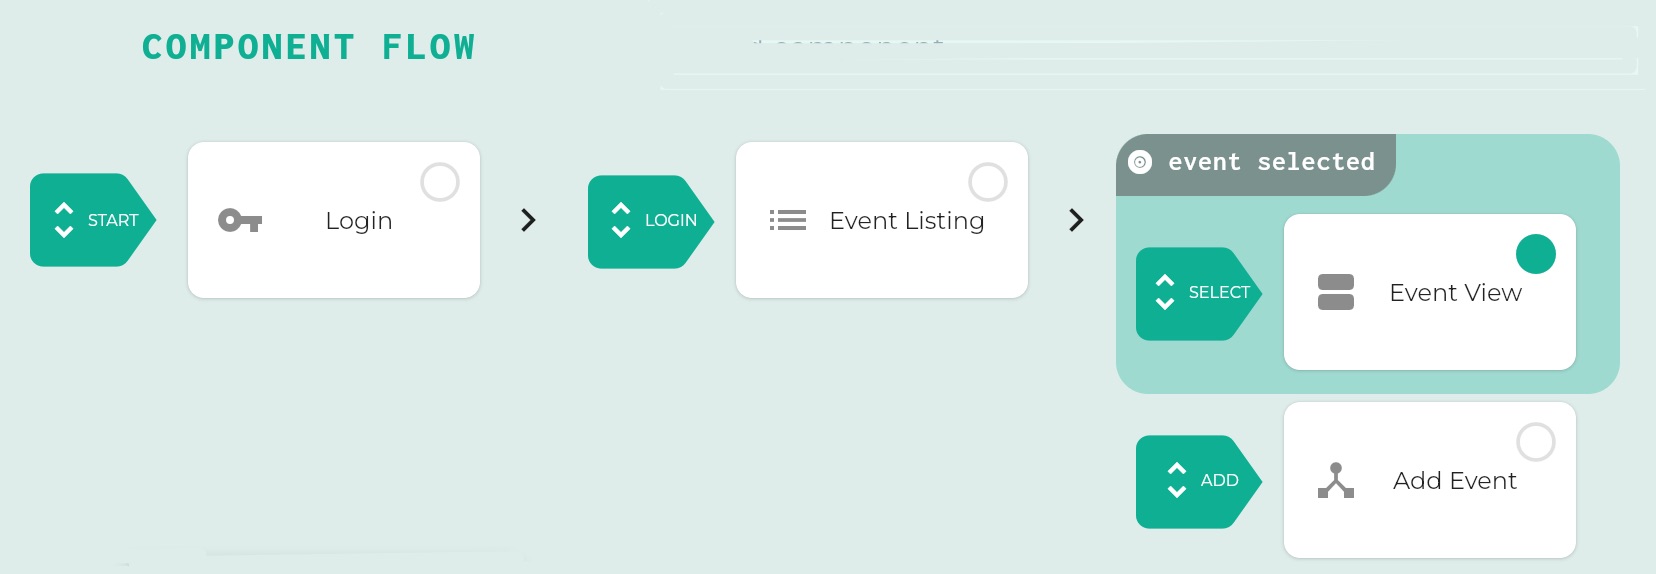
Despite the surface differences, this is fundamentally the same as the flow chart above: it shows a Login component (user logs in), followed by a Listing component (user is shown all events).
The user can choose to SELECT something from the list or to ADD something to the List.
The difference is of course that once you have planned the App out like this in Logiak, you have also already built it!
Component Flow Diagram for the Events App
Watch this short video to see how this can be achieved in Logiak
New Apps have a LOGIN component by default, then we add a LISTING…
In a Logiak Component Flow diagram, each “node” represents a Logiak Component.
4 - How to Build an App
Further Developing the Events App
After more thought about your Events App, maybe you think your App should look like this -
When the user logs in, there is a tabbed dialogue with two tabs: upcoming events and past events.
  graph LR
        A[Logs in] --> X[Tabs]
        X[Tabs] --> B[Upcoming events list]
        X[Tabs] --> Y[Past events list]
        B --> C[Add a new event]
        B --> E[Single Event Tabs]
        Y -->E[Single Event Tabs]
        E --> F[Detailed Event Info]
        F --> I[Edit Event Info]
        E --> G[Actions on the Event]
        E --> H[Reminders on Event regulations]
        G --> N[Cancel Event]
        G --> J[Delete Event]